Cute animal magnets // free pattern
- Pony McTate

- Sep 26, 2018
- 13 min read
Updated: Oct 30, 2018

I always like finding new places for crochet. There's only so many shelves, beds and necks you can adorn with your woolly creations, isn't there? After a while, one's sofa tends to reach cushion saturation point. So it was with great joy last week that I discovered a previously-uncrocheted region of my house: the fridge. It was ripe for decorating. Full of stupid, natty magnets that had somehow found their way onto the fridge and never left. What's worse, they were the cheap scratchy kind that left marks on my stainless steel. Ho ho, I thought. I can fix this.
And fix it I did. My first thought was with a giant granny blanket yarn-bomb covering the whole thing (how cool would that be?!). But with a nod to other members of the family that aren't quite so enamoured with crochet as I am, enter Plan B — cute little animal head magnets. And they're just delightful. They're great fun to make up, not too tricky and will jazz up your whiteware no end. I've designed a mouse, a rabbit and a fox — all wearing jaunty neckwear. Here's the pattern, team.
Prefer a printable pattern? The Animal Magnets pattern is available as a handy-dandy PDF in my Etsy shop here and on Ravelry here. It contains comprehensive instructions and step-by-step photographs in 11 pages of helpful, beautiful, awesomeness. Or scroll down for the free pattern below.

You will need
YARN (for the mouse)
These little guys are designed for a 4-ply/fingering weight cotton yarn. I always use Scheepjes Catona (100% cotton, 50g/125m) because it’s a superior yarn, it’s a dream to work with and it comes in the biggest range of colours out there. And — bonus — it comes in 4 different ball sizes too (10g, 25g and 50g in all 109 colours, plus 100g in 4 basic colours) which is convenient whatever size project you have. I’ve added some detailing to my animals using Scheepjes Maxi Sweet Treat (100% cotton, 25g/140m), a 2-ply/laceweight thread that matches the Catona colours.
You can buy Catona and Maxi Sweet Treat at Wool Warehouse, which ships worldwide, or check the Scheepjes website for a full list of stockists.
Scheepjes Catona (100% cotton, 50g/125m)
254 (Moon Rock) — for the mouse
263 (Petal Peach) — for the inner ears
256 (Cornelia Rose) — for the scarf
Scheepjes Maxi Sweet Treat (100% cotton, 25g/140m)
255 (Nude) — for the nose
406 (Soft Beige) — for the whiskers

NOTIONS
3mm (US C/2 or D/3) hook
A pair of 4.5mm (3/16in) safety eyes (I get mine from 6060eyes.com). Alternatively, you could stitch on eyes with black embroidery thread.
Stitch markers
Tapestry needle and scissors
A strong round magnet, measuring around 3cm (1in) diameter: you can pick these up from craftshops, hardware stores or online. Or you could recycle one from an existing fridge magnet. It will need to be a reasonably grunty one to stick to the fridge through the crochet base (the thin sheet-type magnets aren't strong enough and won't work).
Polyester stuffing
Notes
The pattern is written in UK crochet terminology. There is only one stitch used, the UK dc (US sc).
The animals are worked in the amigurumi method, where rounds start with a magic loop and are worked in a continuous spiral, rather than by closing off each round with a sl st and chaining up to start the next round.
The basic pattern for the head is the same for all three animals. Just change the colour, ears and accessories to suit. There are step-by-step photos and written instructions for the mouse below and then following that, the pattern tweaks you'll need for the rabbit and fox.
Abbreviations
I use UK terminology in my patterns. Here is a list of the stitches and abbreviations used in this pattern, along with their US counterparts.
ch(s): ch(s)
dc: double crochet [US: sc - single crochet]
dc2tog: double crochet 2 sts together (decrease) [US: sc2tog] — see my photo tutorial below for how to work a dc2tog
rnd(s): round(s)
st(s): stitch(es)
Pattern
HEAD
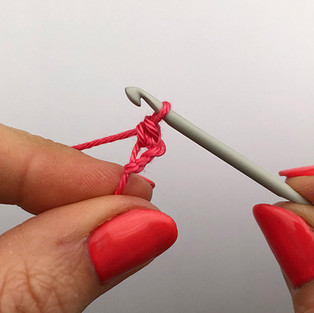
Using Catona (254) Moon Rock, make a magic loop.
Rnd 1 6dc into the loop. [6dc]
Rnd 2 (2dc in first st, dc in next 2 sts) twice. [8 sts]
Rnd 3 (2dc in first st, dc in next 3 sts) twice. [10 sts]
Rnd 4 (2dc in first st, dc in next 4 sts) twice. [12 sts]
Rnd 5 (2dc in first st, dc in next 2 sts) 4 times. [16 sts]
Rnd 6 (dc in first 2 sts, 2dc in next st) 5 times, dc in last st. [21 sts]
Rnd 7 (2dc in first st, dc in next 3 sts) 4 times, dc in last 5 sts. [25 sts]
Rnd 8 (Dc in first 4 sts, 2dc in next st) 4 times, dc in last 5 sts. [29 sts]
Rnd 9 Dc in first 13 sts, 2dc in next st, dc in next 15 sts. [30 sts]


The next round uses decreases, or dc2tog. See my tutorial below for how to work a dc2tog.
Rnd 10 (Dc in first 3 sts, dc2tog in next st) six times. [24 sts]
Tutorial
How to work a dc2tog


The dc2tog is going to be worked over the next 2 stitches.
Insert your hook under the front loop only of the next stitch (2 loops on hook).
Then insert your hook under the front loop only of the following stitch (3 loops on hook).
Yarn round hook. You then finish the dc in the usual way.
Draw yarn through first 2 loops on your hook (2 loops left on hook).
Yarn over again.
Draw yarn through last 2 loops on hook. This is what the dc2tog looks like from the front. See how invisible it is? No obvious gaps or funny-looking stitches.
And here is what it looks like from the back. You can see a little telltale horizontal line under the decreased stitch.
Remove the loop from your hook and pop a stitch marker on it to save your place (you’ll need to pick up the loop again later). Cut yarn leaving a 130cm (50in) tail and set head to one side.
BACK CIRCLE

Using Moon Rock, make a magic loop.
Rnd 1 Ch1 (does not count as a st), 6dc into the loop. [6 sts]
Rnd 2 2dc in each st around. [12 sts]
Rnd 3 (2dc in first st, dc in next st) 6 times. [18 sts]
Rnd 4 (2dc in first st, dc in next 2 sts) 6 times. [24 sts]
Fasten off with an invisible stitch (see my photo tutorial below) and weave in ends.
Tutorial
How to fasten off rounds with an invisible stitch
A clever way to fasten off rounds is by using a tapestry needle to work an invisible stitch. It looks just like a regular crocheted stitch so you can’t tell where the round has been joined.
After the last stitch of the round, cut yarn leaving a 10cm (4in) tail. Pull the tail up through the loops of the last stitch.


Thread the yarn tail onto your tapestry needle.
Skip the first stitch of the round and pass the needle under both loops of the second stitch, from the right side through to the wrong side.
Then pass your needle under the back loop only of the last stitch of the round (where the yarn tail originates from), from the right side through to the wrong side.
Pull gently until the invisible stitch you have just made (marked by the red arrow) matches the other stitches. Weave in the end to secure the stitch.
Now is a good time to check that your magnet for size: you want it the same size (or slightly smaller) than the back circle. Check also to see if your magnet is strong enough to hold the back circle to the fridge. Then set them to one side while you work the face.
NOSE
Using Maxi Sweet Treat (255) Nude and a tapestry needle, embroider the nose.


Work a series of vertical stitches over the tip of the nose. You want the nose to end up vaguely triangular, so spread the stitches out across the top of the nose and work them into the same spot underneath. You may need to pierce the crochet stitches to fill in the gaps. Once the nose is complete, pull the two ends through inside of the head, tie a knot to secure them and snip short.
EYES


Attach safety eyes to the head, or embroider them on with a needle and thread. I put my eyes between Rounds 6 and 7, about 6 stitches apart, but have a fiddle and see what looks good to you.

CLOSING THE HEAD
Insert a pinch of stuffing into the head, pushing it right down into the nose. Continue stuffing until you have half-filled the head.
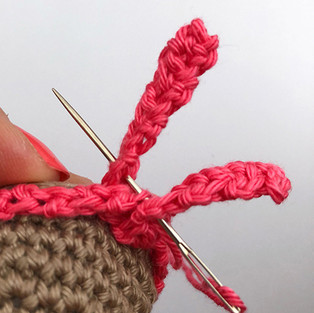
The next step is to attach the back circle to the head with a dc crochet seam (see my photo tutorial below).
Tutorial
Dc seams


Remove the stitch-marker holding the last loop. Insert your hook into the last loop, and then under both loops of the next stitch on the head. Take the back circle and insert your hook under both loops of any stitch.


Work a dc in the usual way. You’ll yarn over, draw your hook through the back circle loops and the head loops (2 loops left on hook), then yarn over again and draw your hook through the remaining 2 loops. It makes a nice tidy seam from both the front and the back.
Continue working a dc seam around the head in this way.


About halfway around, insert your magnet into the head on top of the stuffing. You can add more stuffing if required, poking it under the magnet with your hook. Finish closing the head with dc stitches. It may be a bit tricky to work with the magnet there but just wiggle your hook around and keep at it.
Cut yarn and fasten off, using an invisible stitch for a neat finish.
MOUSE EARS
The mouse ears are made up of two pieces crocheted together with a dc seam. Each piece starts with a magic loop, but instead of working in a continuous spiral you work in turned rows. This makes a nice semicircular ear shape.


INNER EAR (MAKE 2 THE SAME)
Using Catona 263 (Petal Peach), make a magic loop.
Row 1 6dc into the loop. Turn. [6 sts]
Row 2 Ch1 (does not count as a st), 2dc in each st around. [12 sts]
Fasten off and weave in ends.
OUTER EAR (MAKE 2 THE SAME)
Using Moon Rock, repeat as for the Inner Ear, leaving loop on hook at end of Row 2. Turn. Ch1, ready for the next step.
MAKING UP YOUR EARS


Place Outer Ear on top of Inner Ear – right sides facing inwards. You then crochet them together with dc stitches (just like you did with the head and back circle). Fasten off, leaving a 20cm (8in) tail for sewing. Stitch ears onto the head on Round 8 about 4 stitches apart.
MOUSE WHISKERS
Make the whiskers with Maxi Sweet Treat 406 (Soft Beige) and a tapestry needle.


Thread your needle and insert it from one side of the nose to the other. Draw the yarn through until it forms a whisker on one side, a bit longer than required (you can trim it later). Pass the needle under a st on the other side of the nose, which will secure the thread. Then poke your needle back out the other side. This makes the second whisker. Cut yarn to whisker length.
Repeat the process twice more (6 whiskers total). For the last pair of whiskers, work the securing stitch underneath the nose, or wherever works for you.
SCARF WITH TASSELS
Keep your critters warm with some fetching neckwear. The mouse wears a scarf with tassels, but feel free to mix and match.
The scarf is worked in lots of really short turned rows. I find it works better than a single long row. It means you can adjust the length as you need to, and you end up with a nice straight scarf: no annoying curve from a too-tight starting chain.
Using Catona 256 (Cornelia Rose), ch2.
Row 1 In the second ch from the hook, dc. Turn. [1st]
Row 2 Ch1 (does not count as a st), dc. Turn. [1st]
Rows 3-40 Repeat Row 2.


Before you fasten off, check your scarf for length. Wrap it around the head, positioning it behind the ears. Tie the ends under the chin (just like you would a real scarf). Adjust the ends until they are even. When you are happy, fasten off the yarn tails. Then take a fresh length of Cornelia Rose (about 30cm/12in) and a tapestry needle. Work a few stitches through the scarf knot to secure it, then a line of stitches around the head to attach the scarf to the head.


ADDING THE TASSELS
Cut a 5cm (2in) length of Maxi Sweet Treat 280 (Lemon). Fold it in half and use your hook to pull the loop through the end of the scarf. Then use your fingers to draw the ends through the loop. Pull tight to secure the tassel. Repeat 6-7 times for each end of the scarf.


You’re done!


Use this pattern to make other cute creature magnets too.

The basic head pattern for the rabbit and the fox magnets are the same. There's a few tweaks for the ears, accessories and the fox's colour-changes: they're listed below.

Rabbit magnet
For the rabbit magnet, I used the following yarn:
Scheepjes Catona
248 (Champagne) - for the rabbit
253 (Tropic) - for the scarf
410 (Rich Coral) - for the scarf detailing
Scheepjes Maxi Sweet Treat
255 (Nude) - for the nose
EARS (MAKE 2 THE SAME)
Using Catona 248 (Champagne), make a magic loop.
Rnd 1 Ch1 (does not count as a st), 6dc into the loop. [6 sts]
Rnd 2 Dc in each st around. [6 sts]
Rnd 3 (2dc in first st, dc in next 2 sts) twice. [8 sts]
Rnd 4 Dc in each st around. [8 sts]
Rnd 5 (2dc in first st, dc in next 3 sts) twice. [10 sts]
Rnd 6 Dc in each st around. [10 sts]
Rnd 7 (Dc2tog, dc in next 3 sts) twice. [8 sts]
Rnd 8 Dc in each st around. [8 sts]
Rnd 9 (Dc2tog, dc in next 2 sts) twice. [6 sts]
Rnd 10 Dc in each st around. [6 sts]
Fasten off, leaving a 15cm (10in) tail for sewing. Stitch the ears onto the head at Rnd 8 about 3 sts apart, or as you wish.

SCARF
The rabbit's scarf uses the same pattern as above, with different decorative flourishes.
Use Catona 253 (Tropic) to work the scarf. Weave in ends but do not stitch it onto the head just yet. Just tie in on in place. Using Catona 410 (Rich Coral), embroider 7-8 stitches around one end of the scarf. Add a line of running stitches along the length of the scarf, securing the scarf to the head as you do so. Embroider the other end of the scarf with stitches then weave in all ends.

Fox magnet
For the fox magnet, I used the following yarn:
Scheepjes Catona
383 (Ginger Gold) - "Ginger"
106 (Snow White) - "White"
110 (Black)
245 (Green Yellow)
Scheepjes Maxi Sweet Treat
128 (Tyrian Purple)
HEAD
I'll confess, I struggled with how to write up the colour changes for the fox head. I didn't want to make it too wordy or too complicated for you guys. So in the end, I've gone for a shorthand-but-still-understandable version. I've repeated the Head pattern from above and under each round listed the stitches you work in each colour. Follow the Head pattern to see where the increases are, whilst keeping an eye on when the next colour change is coming up.
To work a colour change:
Begin the colour change the stitch before you want the new colour to start, i.e. at the last stitch of the old colour. Start working the stitch with the old colour (for the first yarn over) but use the new colour to work the second yarn over, finishing the stitch in the usual way. You will now be working with the new colour. Carry the old colour along under your stitches so you can pick it up again as required.
Using Ginger make a magic loop:
Rnd 1 6 magic loop [6dc]
6dc in Ginger.
Rnd 2 2dc in first st, dc in next 2 sts twice. [8 sts]
4dc in Ginger, 3dc in White, 1dc in Ginger.
Rnd 3 (2dc in first st, dc in next 3 sts) twice. [10 sts]
6dc in Ginger, 4dc in White.
Rnd 4 (2dc in first st, dc in next 4 sts) twice. [12 sts]
1dc in White, 7dc in Ginger, 4dc in White.
Rnd 5 (2dc in first st, dc in next 2 sts) 4 times. [16 sts
2dc in White, 9dc in Ginger, 5dc in White.
Rnd 6 (dc in first 2 sts, 2dc in next st) 5 times, dc in last st. [21 sts]
3dc in White, 11dc in Ginger, 7dc in White.
Rnd 7 (2dc in first st, dc in next 3 sts) 4 times, dc in last 5 sts. [25 sts]
4dc in White, 14dc in Ginger, 7dc in White.
Rnd 8 (Dc in first 4 sts, 2dc in next st) 4 times, dc in last 5 sts. [29 sts]
6dc in White, 15dc in Ginger, 8dc in White.
Rnd 9 Dc in first 13 sts, 2dc in next st, dc in next 15 sts. [30 sts]
6dc in White, 16dc in Ginger, 8dc in White.
Rnd 10 (Dc in first 3 sts, dc2tog in next st) six times. [24 sts]
6dc in White, 12dc in Ginger, 6dc in White.

BACK CIRCLE
Use Ginger to crochet the back circle.
When working the dc seam to attach the back circle, you can either follow the colour changes of the head (like I did - there's more ends to sew in but you get a neater finish) or just use one colour (easier).
NOSE
Use Catona (110) Black to embroider the nose.
EARS (MAKE 2 THE SAME)
The fox’s ears are worked in turned rows, decreasing as you go, to form the pointy tip. I suggest just skipping a stitch rather than working a proper dc2tog: it’s easier and the ear is small enough that you don’t notice any gaps. There’s also a colour change in there as well.
Using Ginger ch5, leaving a 10cm (4in) tail at the start for sewing.
Row 1 Dc in second ch from hook and each ch to end. Turn. [4 sts]
Row 2 Ch1 (does not count as a st throughout), dc in first st, skip next st, dc in next 2 sts. Change to Black. Turn. [3 sts]
Row 3 Ch1, dc in first st, skip next st, dc in last st. Turn. [2 sts]
Row 4 Ch1, skip first st, dc in last st. [1 st]
Fasten off and weave in end, maintaining the pointy ear. Use the starting yarn tail to stitch the ear onto the head.
BOWTIE
Using Catona 245 (Green Yellow), ch 8
Row 1 Dc in second ch from hook and each ch to end. Turn. [7 sts]
Rows 2-3 Dc in each st to end. Turn. [7 sts]
Fasten off, leaving a 30cm (12in) tail. Wrap the tail tightly around the middle of the bowtie to cinch it in. Give it 5-6 wraps, or as many as required. Thread the tail end onto a tapestry needle and weave it under a few stitches to secure the wrap. Don't cut the yarn just yet because you will use it to stitch the bowtie onto the head.
But first, decorate your bowtie with some French knots using Maxi Sweet Treat 128 (Tyrian Purple) (5 or 6 knots each side). Weave in purple ends then use remaining long green tail end to stitch onto the head, at the back circle seam.
Easy as that! They're supercute, aren't they? I think they'd make perfect little gifts for loved ones, especially those hard-to-buy-for people (Uncle Fuzzy, I'm looking at you). If you share your animal magnets on social media, why not tag #ponymctate so I can see them too? I'd love to see your clever creations!
xx P

This pattern is an original pattern by Pony McTate. Don't be a plonker: please do not claim this pattern as your own. If you wish to share this pattern, you may link to this page but please do not repost the pattern on your site. DO NOT sell the pattern or distribute it.
You may sell products made from this pattern but please clearly credit Pony McTate as the designer and provide a link to my website www.ponymctate.com // Thanks, team!


Absolutely loved this cute animal magnets pattern. The step‑by‑step guide is so easy to follow and perfect for gifting or decorating. I started thinking about Angie Anderson Career & Life Facts while crafting her creativity really inspires this kind of fun, artistic project. Thanks for sharing such an adorable free pattern.
Hôm trước mình thấy có bạn nhắc đến link https://mm88.london/ trong một cuộc trò chuyện trên mạng, nên mình cũng đã thử vào xem cho biết. Chỉ lướt qua một lúc ngắn thôi nhưng mình cảm nhận được giao diện khá hợp lý, bố cục rõ ràng và dễ nhìn. Đọc nội dung không bị rối mắt, nên mình lại quay về để xem thêm những bình luận khác.
Mình có lần lướt đọc mấy trao đổi trên mạng thì thấy nhắc tới xổ số F8bet, nên cũng tò mò xem qua cho biết mọi người đang bàn gì. Mình không tìm hiểu sâu, chỉ đọc lướt trong thời gian ngắn để nhìn bố cục và cách sắp xếp nội dung tổng thể, cảm giác khá gọn và dễ theo dõi, đọc nhanh cũng không bị rối nên mình quay lại tiếp tục xem các bình luận khác.
Jacq360 explains how On-Page SEO Services can improve website ranking and traffic. The tips in this article are clear and simple. Small changes like headings, meta tags, and internal links make a big difference. Following Jacq360 guidance helps businesses get noticed on Google faster. I like how they make SEO easy to understand for beginners and small business owners.
HelloSays is a great platform for discovering trusted financial services along with useful local options. I also like how it highlights home services for everyday needs. This makes it easier to find reliable businesses without wasting time searching everywhere.